

Introduction
The dbt Semantic Layer in dbt Cloud provides a centralized way to define and manage business metrics, ensuring reliable and uniform insights across BI platforms. Even with the Starter Plan, you can connect your data platform, build reusable models and metrics, and make them accessible to downstream BI applications.
This step-by-step guide takes you through setting up dbt Cloud with Snowflake, creating models and metrics, enabling the Semantic Layer, and integrating it directly with Tableau Cloud. With this setup, analysts and business users can build dashboards by simply dragging and dropping governed metrics from dbt without writing SQL ensuring reliable, consistent reporting across the organization.
What is the Semantic Layer in dbt?
The Semantic Layer in dbt lets you define metrics, dimensions, and entities in one central place and share them across BI tools like Tableau and Power BI. It ensures consistent definitions, supports saved queries, and allows non-technical users to access governed data without writing SQL, enabling self-serve analytics and better data governance.
Set Up dbt Cloud and Snowflake
Step 1: Create a dbt Cloud Account
- Go to: https://cloud.getdbt.com/signup/
- Sign up using: Email address, Full name, Password, Organization name.
- Click Create Account and You’ll be logged into dbt Cloud
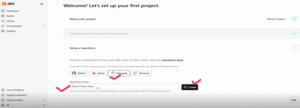
Step 2: Create a Project
- After logging in, click “New Project,” enter a name (e.g., my_dbt_project), and click “Create Project.”
Step 3: Configure Development Environment
- Go to the “Environments” tab in your project, locate the default Development environment,click”Edit”.
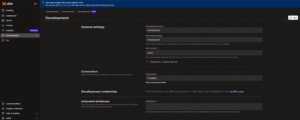
- You will configure the Snowflake connection in the next step.
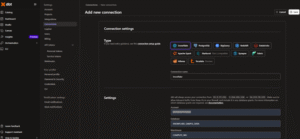
Step 4: Add New Connection (Snowflake) & Test It
- Under Connection, select Snowflake as the adapter, fill in the required fields (account, user, password, warehouse, database, schema).
- Click Test Connection to validate; if successful (green message appears), click Save to apply.
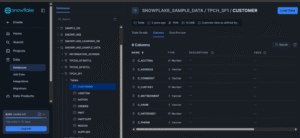
In this project, Snowflake was connected using a public dataset:
Database: SNOWFLAKE_SAMPLE_DATA
Schema: TPCH_SF1
Table: CUSTOMER — this table was used throughout the project for all demonstrations.
Step 5: Set Up a Repository (Git Integration)
dbt Cloud needs a Git repo to track your project files:
- Under Environment → Repository, click Add Repository, choose your Git provider, authorize access, enter your repo name, and click Create to complete the setup.
- After clicking Create, you’ll be redirected to a confirmation page—this indicates your project is now successfully configured with both Snowflake and your Git repository.
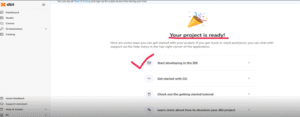
Step 6: Initialize the dbt Project
- Click Start Developing in the IDE, then select Initialize dbt Project to begin.
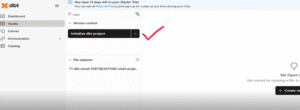
- You’ll then be redirected to a page where dbt automatically sets up the default project structure with folders like models and dbt_project.yml.
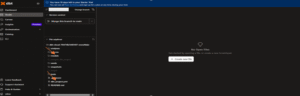
- After setup, edit files in the browser IDE and use Commit & Sync to push changes to your Git
Before building models and metrics, we first load customer data from the Snowflake Sample Data into our own Snowflake environment under a custom database and schema. With the data in place, we define models, YAML sources, and metrics—laying the foundation for a centralized dbt Semantic Layer that powers consistent analytics across BI tools.
Build Models and Metrics
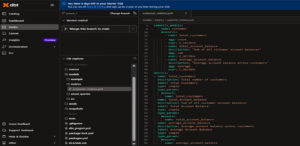
Step 7: Create Models and Define Sources & Metrics
In the File Explorer, under models/, create two folders:
- src/ → add the following files:
- customer.sql
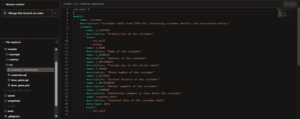
- customer_schema.yml
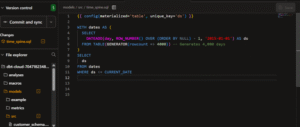
- time_spine.sql
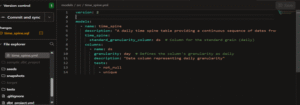
- time_spine.yml
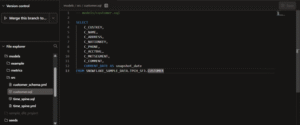
- metrics/ → add:
- customer_metrics.yml

Step 8: Save and Commit Changes
Click Commit and sync, add a commit message like “added source models and customer metric”, then confirm to push your changes.
Step 9: Run and Validate Your Models in dbt Cloud
- Run dbt run in the IDE to execute your models, sources, and tests, then validate the results in Run History and explore your assets in the Documentation
Step 10: Create a Production Job to Build Models
- Go to the Orchestration tab, navigate to Jobs, and click Create Job -> Deploy Job
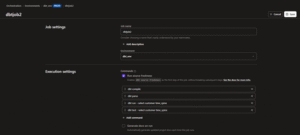
- Fill in Job Configuration
- Set the Job Name (e.g., dbtjob2), choose your Production Environment, and add the dbt commands under Execute Steps.
- Save and Run the Job
- Click Save Job, then on the job run page, click Run Now to start your first manual run.
- Monitor the Job Run
o Monitor logs in real-time to track each step (e.g., dbt deps, dbt run) and review the outcome to address any failures.
Enable the dbt Semantic Layer
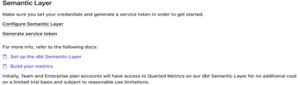
Step 11: Set up dbt Semantic Layer
Select environment
- Select the environment where you want the Semantic Layer to be enabled.
- Go to Account Settings from the main navigation panel.
- Under the Settings section, click on Projects and choose the project where you want to configure the Semantic Layer.
- On the Set Up Semantic Layer Configuration page, choose your preferred deployment environment and click Save to activate the Semantic Layer in that environment.

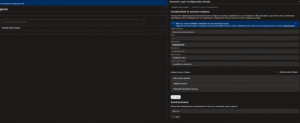
Step 12: Configure Credentials & Create Tokens for dbt Semantic Layer
- Choose Deployment Environment
- Go to Environments > Credentials & Service Tokens in your dbt Cloud project.
- Click on “Add Semantic Layer Credential”.
- Add Credentials
- Enter credentials from your data platform (e.g., Snowflake).
- Use read-only access to schemas containing dbt models.
- Create & Link Service Token
- After adding the credential, create a service token.
- Link the token to the credential.
- Use this token for authenticating downstream tools (like Tableau, Power BI, or Postman).
Step 13: Verify Semantic Layer Configuration
- Navigate to Catalog → Resources and select a Semantic Model.
- In the right-hand panel, check if key metrics (like total_customers, average_account_balance, etc.) are visible.
- Ensure all expected metrics are listed correctly for that model.
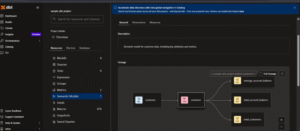
Tableau Cloud Integration
As part of the July 2025 release, dbt Cloud now offers seamless integration with Tableau Cloud, enabling direct access to the dbt Semantic Layer. This enhancement empowers analysts and business users to build dashboards using pre-defined, reliable metrics—such as total customers or average account balance—without needing to write SQL. By leveraging centrally governed definitions from dbt models, teams can ensure consistent reporting, reduce data discrepancies, and speed up decision-making across the organization.
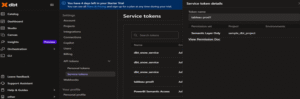
Step 14: Create a Service Token for Tableau
- In dbt Cloud, go to Account Settings via your profile and click New Token under Service Tokens.
- Enter token details: name it (e.g., Tableau Cloud Access), set permission to Semantic Layer Only, and select your project.
- Click Add Permission after
Step 15: Get dbt Semantic Layer Credentials (for Tableau Cloud)
- In your dbt Cloud project, go to Settings → Semantic Layer and copy the Host URL and Environment ID.
- Use the service token created earlier (Step 12) for authentication when connecting Tableau.
Step 16: Connect Tableau Cloud to dbt Semantic Layer (dbt Labs)
- Log in to Tableau Cloud, then go to Explore → New → Workbook to create a new workbook.
- Click Connect to Data, then select the dbt Semantic Layer (dbt Labs) connector (available only in Tableau Cloud UI).
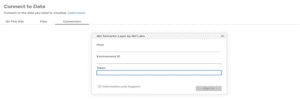
- Enter the Host, Environment ID, and Service Token from dbt Cloud when prompted.
- Click Sign in to access all your dbt-defined metrics directly in Tableau.
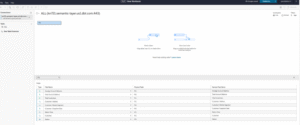
Easily drag and drop metrics like Average Account Balance by Customer and build visualizations directly — powered by the dbt Semantic Layer for consistent, governed analytics.
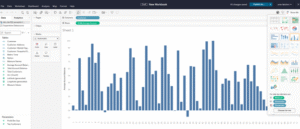
The image above shows how ‘Customer’ and ‘Average Account Balance’ are dragged into the Tableau Cloud canvas, displaying a chart powered by the dbt Semantic Layer metrics.
Conclusion
Setting up the dbt Semantic Layer with Tableau gives you a strong foundation for analytics. Instead of building metrics separately in every dashboard, you now define them once in dbt and reuse them across Tableau. This not only saves time but also removes the risk of inconsistent KPIs. As your project grows, this approach ensures that both data teams and business users speak the same language when exploring insights.